Thursday, April 16, 2015

Dreaming

I've been dreaming about starting up my cupcake business again. Would it be delivery, an etsy shop, a store front bakery, a food truck, a cupcake stand, a cupcake cart? I keep thinking that it would be such a shame not to open a business when my product is sooooooooooooooo good. Yes, I am tooting my own horn.

Just now is not quite the right time, but some day. Until then I'll keep experimenting, perfecting recipes and blogging. It's so fun to dream and research and plan and bake!! Here are some of my most recent trials. I tweaked each recipe to my own liking, of course, but the gist of each recipe came form the links below (pics are of my goodies).


Chocolate Chocolate Chip Zucchini Cupcakes from I Am Baker


Cranberry Chai Cupcakes from BHG


Orange Cardamom Rose Cupcakes from Hostess with the Mostess


Butterfinger Cupcakes from Confessions of a Cookbook Queen

They were all fabulous. I make a mean cupcake, that's true, but I can also pick out a mean recipe. With the training of my palate has come a training of the eye and I can spot a great recipe, idea or flavor pairing a mile away. I've proven this statement wrong, by the way, just a few times. Hee, hee.

The best thing about dreaming is that all the hard work, long hours, stress, financial strain, etc. are not part of my experience - just the fun stuff. ;)

Wednesday, March 26, 2014

Jar It

I recently made cupcakes for my mother-in-law's 80th birthday party - Cinnamon Mocha and Cherry Crisp. I had left over frosting and leftover chocolate cake in the freezer; and you know how I love to use up all my leftovers in scrumptious ways.

I took a few jars down form my windowsill (I am also an avid jar collector - a jar can't hardly get passed me) and made cupcake parfaits using my leftover ingredients.


On the left is chocolate cake with cinnamon coffee buttercream and cinnamon brown sugar oat crumble. On the right is chocolate cake with cherry buttercream and cherry preserves. Yummy, yummy (my favorite word).

They were so nice to eat with a spoon - way less mess. About two cupcakes fit in these particular jars so I didn't have to go back into the kitchen to get another cupcake. Maybe I'll do the jar thing more often. What a beautiful and scrumptious mess.

Friday, March 14, 2014

Sourdough Cupcakes! What?

I know I said that I would try to limit my non-cupcake escapades. This week's blog entry is part cupcake and part something else truly wonderful.

Last month I started my own sourdough starter. This is when you mix together a certain amount of flour and water and feed it twice a day (discarding some of the starter, and adding in more flour and water) for at least a month. This cultivates the natural yeast in the air for making bread (and other goodies) without having to buy yeast.

I've been making bread for several months now and was excited about the prospect of not having to buy yeast anymore. Little did I know that I was walking into a wonderful world where my sourdough starter could serve as the base for breads, pancakes, waffles, pizza dough, muffins, and yes, you guessed it, cupcakes. Yippee!

I found a recipe at King Arthur Flour for chocolate sourdough cake and modified it to make beautiful, rich, chocolatey cupcakes. The cupcakes do not taste sour or bready in any way. Also, they rose beautifully. Thank you my little natural yeast friends.


I used these cakes for a baby shower where I filled them with eggless cookie dough, frosted them with peanut butter frosting, and drizzled salted caramel on top. They were scrumptious - too scrumptious.


I've also used the starter to make English muffins - which also turned out yummy.


For Easter I'm planning on using my starter to make carrot cake cupcakes based on another online recipe that is supposed to be super moist and super yummy. How many times can a person use the word "yummy" in one blog post? I' haven't come anywhere near my limit yet. Hee, hee.

I still use my starter mainly for bread. I bake two loaves of sourdough every other week. My starter is still in it's baby stage, so I am keeping it on the kitchen counter and continuing to feed it twice a day. I am looking forward to transitioning the starter into my refrigerator where I'll only need to feed it once a week or so. Until then, I've got three little ones in the house to take care of. ;)

If you are interested in starting your own sourdough starter, here is the website I used as a jumping off point: http://www.culturesforhealth.com/how-to-obtain-sourdough-starter.

Saturday, February 15, 2014

Use It Up

This post is once again not about cupcakes. I'll try not to make this the norm, but I haven't been baking cupcakes as much as I've been baking everything else under the sun. This week my boys and I cut out heart cookies out of store-bought gingerbread dough and decorated them with royal icing for Valentine's Day. This was my first time using royal icing. It's fun.

Royal icing is the kind used on cookies because it dries hard allowing you to stack and pack cookies without smudging. There are at least two ways you can make this kind of icing. You can use egg whites or meringue powder (for those of us that are a little nervous about raw eggs). Here is Martha's recipe.

We had a bunch of icing left over even though the boys piled mountains of it on top of their cookies. I decided to make some frosted oatmeal raisin cookies for my husband. Oatmeal cookies are one of his favorites; I think, in part, because the oats give the cookies a little more nutrition than other cookies. On that note, I recently learned that rolled oats are more nutritious than quick oats (I guess that's pretty logical, like whole wheat flour has more nutrition than white flour - less processed). Anyway, unless the recipes you use call for quick oats, I recommend using rolled oats instead. If you have a store near you that sells grains in bulk, they are usually 99 cents a pound, and sometimes on sale for less.

I actually used quick oats for this batch of cookies as I had a container full that I needed to use up. As it happens, the whole reason I made the cookies was to use up the royal icing. If you couldn't tell already, I love using things up. I get a lot of satisfaction out of using up ingredients and leftovers; and using up two things at once in a recipe is even more satisfying. Without further ado, here at last is a pic of my oatmeal raisin cookies, drizzled with royal icing.


I used a basic oatmeal cookie recipe from BHG with my own tweaks. Click here for the recipe on the BHG site. I scoop them with a 1/4 cup measuring scoop to make big cookies. I like big cookies because you don't have to keep going back to the cookie jar... and you get through baking your dough quicker. I love that! If you scoop them big, they will take 12 to 14 minutes to cook.

Thursday, February 6, 2014

Not About Cake

I recently started doing some grocery shopping at the 99 cents store. We are tightening our belts around here. Last week they had perfect blackberries and I put myself in a blackberry pie kinda mood. While it is not the cheapest pie to make, it makes a big difference when you spend 99 cents instead of $2.98 or more on 6 oz packs of blackberries.

I used my favorite crust recipe, which I will keep a secret for now, and looked up recipes for the filling. I found a few similar versions that got really high ratings that mixed between 4 and 6 cups blackberries with sugar, cornstarch and a little lemon juice. I should have looked further. I used one of said recipes and ended up with a beautiful tasty pie containing a lake of juice inside.

My hubby came home and caught me with a straw in the pie, sucking out juice and spitting it into the sink. I know, not a pretty picture. The pie was still yummy - plump blackberries and perfectly thick buttery crust. I was surprised to find that my crust did not end up soogy. Maybe I got the juice out in time. Next time, however, I'll cook down my filling first.


The pie ended up costing about $6 or $7. My husband commented that I could have purchased a pie for less. True, true; but it wouldn't have been as good (at least that is what I am claiming), and this one pie can serve as dessert for a whole week. So that works out to about a $1 a day. Except that it only lasted half the week. I won't recalculate.

Saturday, February 1, 2014

Breakfast Cake and a Tinsy Rant

As you can imagine cake is a big part of our home life. While I can down a couple of cupcakes per day on a regular basis, my hubby is more of an ice cream kinda guy. He does, however, love quick breads and muffins (a.k.a. breakfast cake) with his mid-morning coffee. It's funny, as much as I love cake, I don't really go for muffins and quick breads. Maybe it's the lack of frosting. I love making them though and my husband and little guys love eating them.

Earlier this week my hubby requested something a bit more healthy. It is a new year after all. Might as well attempt a change in diet. I baked up a couple of loaves of zucchini bread with a simple toasted almond crumble on top.


I love recipes that make double loaves; one for now and one for the freezer that I can pull out when I have company over or an event I need to bring something to. The base recipe for this bread is from Better Homes and Gardens. You're supposed to wait 10 minutes before removing the bread from the pans. I would wait more like 20. I find that 10 minutes is not long enough for the bread to be cool enough to not stick to the bottom of the loaf pan, leaving a gaping hole at the bottom of your bread (calm down, breath).  Also, keep in mind that zucchini bread slices best when you wrap and refrigerate it overnight.

One thing I'll say about a crumble topping on quick breads; so much falls off turning the bread out of the pan that I wonder each time why I even bother with it. Old habits die hard I guess. Also, quick breads are nothing without a crumble or glaze on top (this girl's opinion).

Here is my version:
3 cups flour
1 Tbsp baking powder
1 tsp salt
1 1/2 tsp cinnamon
2 eggs
2 tsp vanilla
1 cup oil
2 cups sugar or brown sugar or a mixture*
1 large or two normal size zucchini (shredded to about 2 1/2 cups)

Crumble Topping:
1/2 cup brown sugar
6 Tbsp flour (or 3 Tbsp flour and 3 Tbsp oats)
4 Tbsp butter, cold
2/3 cup toasted chopped almonds

Mix dry ingredients.
Mix wet ingredients and sugar in a another bowl.
Dump wet into dry and mix all at once just until moist.
Pour into two greased loaf pans.
Mix up crumble ingredients with fingers and sprinkle on top.
Bake at 350 about 55 minutes.
Cool in pans about 20 minutes before removing.
Wrap completely cooled loaves and refrigerate overnight before slicing.

*For a darker bread with a caramel-like flavor use brown sugar.

Tuesday, January 28, 2014

Wacky Cake

First off, please forgive the pictures in this post. My camera is sporting some sort of digital disease and my photo editing skills are deeply lacking, but I didn't want to leave you with nothing to look at. With that said, we enter a world where chickens are of no use to us. Let me explain.

Running out of eggs last week sent me on a journey through wacky cake land. If you've never heard of it, wacky cake uses baking soda and vinegar for leavening instead of eggs. It's not the best cake in the world, but it's not bad - it certainly does the trick - especially as a vehicle for gobs and gobs of frosting. It's also a great base for a vegan cake.

So last week I had a bunch of ingredients I needed to use up (dulce de leche, chocolate ganache and a cookie crunch topping that fell off of some unsuccessful cookie bars) and no eggs. I remembered wacky cake and looked up a recipe for a simple chocolate version.

I baked it up and after it cooled slathered on a very thick layer of dulce de leche frosting. Then I sprinkled as much of the cookie crumb topping as I could fit on top, drizzled it with more dulce de leche and then drizzled on my left over chocolate ganache. Although impressive looking, the flavor was good, but not spectacular.

This is what was left after I took a fork to half of the cake.


There is something quite happy and fun about taking a fork to a whole cake and just digging in. It's like a lot of things that you think are very important are suddenly thrown out the window and you find yourself smiling about it. Don't take that analogy too far.

This week I got inspired and decided to use up some overripe bananas in another wacky cake recipe. I frosted it with a cinnamon scented peanut butter frosting and topped it with a few banana chips so as not to leave the cake too naked.


I now find myself in a wacky cake frenzy contemplating the endless wacky cake possibilities. If I really think about it, it's the perfect cake for me as I mostly care about frosting anyway and if I ever had to live in a world without chickens, I'd be okay.

Wednesday, January 22, 2014

Feeling Grinchy?

Now that my business is on hiatus I am turning my attention back to blogging to keep my cupcake muscles in shape. I was continuing to experiment while my business was running, but didn't have the will to keep you all abreast of my exploits. Blackberry chocolate wine, lemon white chocolate coconut, and cranberry chocolate are some of the experiments you didn't get to read about.

This week lychees were on my mind. I bought a can months and months ago and finally decided to get to experimenting. I spent time online looking at what other people had done with lychees in cupcakes. Most people added rose and raspberry or paired the lychees with coconut. I decided to open up the can and taste them for myself before I planned my flavor profile.

Working with the canned fruit was kind of like being back in science class. If you haven't experienced canned lychees, they look like little brains and feel like them too; and when you chop them up they look like chopped up fish. The flavor is exotic - closer to star fruit or papaya than apples or oranges - with the consistency of pears. It wasn't my favorite flavor, but I figured I might as well move forward with my adventure.

I chose to pair the lychees with green tea. I thought the flavors would compliment each other. Also, I love green tea buttercream with all my heart (okay, a little dramatic, I know). I patted the lychees as dry as possible and tossed them with a little flour before I added them to my green tea cupcake batter. They baked up perfectly and I could taste both flavors - a success! Yippee! I had anticipated using the left over lychees and syrup for the frosting, but as I could already taste them in the cake and again, the flavor was not my favorite, I went with my beloved green tea buttercream (more drama, but I know all you green tea lovers are feel'n me). I also decided to bake minis in my toaster oven to avoid heating my whole house with the regular oven.


I added a tiny pink heart sprinkle atop each mini cake for the color contrast. They reminded me of the grinch, so I call them Green Tea Lychee Grinchy Cupcakes. They are quite cute if I do say so myself.

Thursday, April 11, 2013

Experiments

Don't know if any of you out there ever experiment with things - cooking, hairstyles, accents, etc. For me, obviously, it's cupcakes. If you do experiment, you probably know the pride of a successful venture on the first try, the annoyance of having to try something two or three times to get it just right, or the feeling of utter failure at having to give up on it entirely (had to do this with a chili mango lime cupcake). This is my process as I play with cupcake flavors.

I recently tried out a pink grapefruit and honey cupcake that I've been thinking about for some time. I am about to start on my third test run. In the first attempt I used a vanilla cake base and added fresh grapefruit flavor to it. The flavor was delicious. The texture? Not horrible, but not my fav. In the second trial I used a honey cake base with the same fresh grapefruit flavor. The texture was great. The flavor? Too much honey. For the third attempt I am bringing the two together in a "mostly sugar with a little honey" cake. Hoping for a perfect balance of honey and grapefruit flavors brought together with the texture that I love.

P.S. Most of you probably already know this, but I've opened up my very own cupcake bakery in Orange County. Visit my website: http://loverbeesbakeshoppe.com/

Sunday, January 27, 2013

Lightening Up

I'm lightening up - and by that I don't mean losing weight (I wish) or being more laid back. I'm lightening up my frostings a bit. You may remember my mentioning that I love thick, dense frostings (which I do), but as my husband (and the grand majority of people in this world) do not, I've been practicing making my frostings creamier and fluffier.

Here are the two tricks I have been satisfied with the most:

Tip #1: Use more milk/cream. I've added about 2 Tbsp. of milk/cream to my normal frosting recipes. The frosting ends up a little looser but far more pipable. (In the past I've often busted open my frosting bag trying to pipe too thick a frosting)

Tip #2: Add more butter. This type of adjustment actually changes a frosting recipe all together. You'll probably need to omit any milk/cream called for in the recipe. I usually double the butter and use my whipping attachment instead of my beater. A lot of air gets whipped into the butter creating a lighter and fluffier texture that amazingly enough usually requires less powdered sugar. More butter or more sugar? You pick your poison. :)

Monday, December 17, 2012

Thanksgiving Cupcakes

Just wanted to share some Thanksgiving cupcakes. These were for gifting and celebrating.


Vegan Streuseled Spice Cake - spice cake topped with a brown sugar pecan streusel, frosted with a creamy white frosting and sprinkled with nutmeg

German Chocolate Cupcake with Chocolate Beer Frosting topped with chocolate jimmies

Lemon Cranberry Cupcake - vanilla cake filled with cranberry sauce, frosted with lemon cream cheese frosting and topped with a sugared cranberry

Chocolate Chip Banana Cupcakes with Chocolate Cream Cheese Frosting topped with mini chocolate chips


Saturday, October 20, 2012

Apple Picking & A Baby Shower

I recently went apple picking with my little family up in Oak Glen. We came home with two huge bags of apples. Needless to say I have been baking like a mad woman. I decided to make fresh apple cupcakes for a friend's upcoming baby shower.

I used Martha Stewart's apple cupcake recipe. It's a good one - lots of autumn spice. I was thinking of going with a caramel frosting even though Martha recommended cream cheese. I've been doing a lot of cream cheese frosting lately and am pretty tired of it; but after I tasted the cake there was nothing that would compliment it better than a cream cheese frosting, so I bit the bullet. I used BHG's recipe instead of Martha's (Sorry Martha). BHG adds an additional teaspoon of vanilla and an extra cup or two of powdered sugar. I like the flavor and consistency of this recipe and I tend to stick with what I like.

The shower theme was based on Disney/Pixar's Up. I decorated the cakes with a fondant balloon and piped in the string. They turned out pretty cute.


I've already turned most of the apples into the following: 5 pies, 2 breads, 2 batches of cupcakes and 1 batch of apple butter.


I have one more pie to make for my hubby, some apply sorbet for my toddler and maybe some cider.

Monday, October 8, 2012

Many Cakes Later

I'm finally getting around to blogging. Although I have slowed down in writing I have not slowed down in baking. I neglected to take pictures of all of my recent ventures - pure laziness.

Here is a list of what I have made since my last posting:
I've also tried my hand at a rustic peach pie, a tomato tart, goat cheese and apricot muffins, pretzel, butterscotch and chocolate chip cookies, butterscotch oatmeal cake and a Snickerdoodle Quick Bread.

I did take photos of a few of the cakes. The Chocolate Bourbon Salted Caramel cupcakes were sublime. You could taste the bourbon as it was in the cake and in the caramel, but it was not overpowering in the slightest. Very tasty. Hard to eat just one.


The Pumpkin cupcakes and Pumpkin Pop Tart cupcakes are pictured together. My hubby loved the pumpkin and I loved the pop tart ones. Pumpkin pie flavored Pop Tarts are tossed into a brown sugar cupcake batter. Absolutely fabulous. I love all things brown sugar so this recipe is right up my alley. I think I'll use it as a base for all kinds of creations.


In other news (well actually, in very related news), my hubby got me a baking pantry. We needed extra storage space anyway and part of the cabinet we purchased is devoted to my baking gear, ingredients and other essentials. It's awesome. Everything at my fingertips in one place. I don't have to go hunting in several cabinets for what I need anymore. Yes, I am spoiled.


Friday, September 21, 2012

A Baby Shower

I got to make cupcakes for a friend's baby shower this past weekend. It was so fun to make something so cute. I went with an orange creamsicle cupcake from BHG. I liked the recipe, but found myself wanting a little more creamy or milky flavor. The recipe calls for a cream cheese frosting with a couple of teaspoons of orange gelatin mix and a teaspoon of orange zest added to it. It was just a little too tangy for me, but still good and oh so enjoyable.

The shower was a Noah's ark theme so I baked my cupcakes in baby animal printed baking cups. I used a french tip to pipe my frosting and covered each cake with white sprinkles. I finished the cupcakes with fondant baby animals. My fondant was too thick, but I was worried about the animals staying in place if I made them too thin. I also happen to really like fondant - surprise, surprise.


Wednesday, September 19, 2012

A Special Project

My husband's aunt turned 80 years beautiful this month. Guess what I brought to the party?

My sister-in-law and I each brought a batch of cupcakes for the guests. Hers were great - red velvet with cream cheese frosting and what I think might have been a strawberry cheesecake cupcake (I didn't get to taste that one). I had heard from our aunt that maple and cream cheese are her favorite flavors. I tackled the maple.

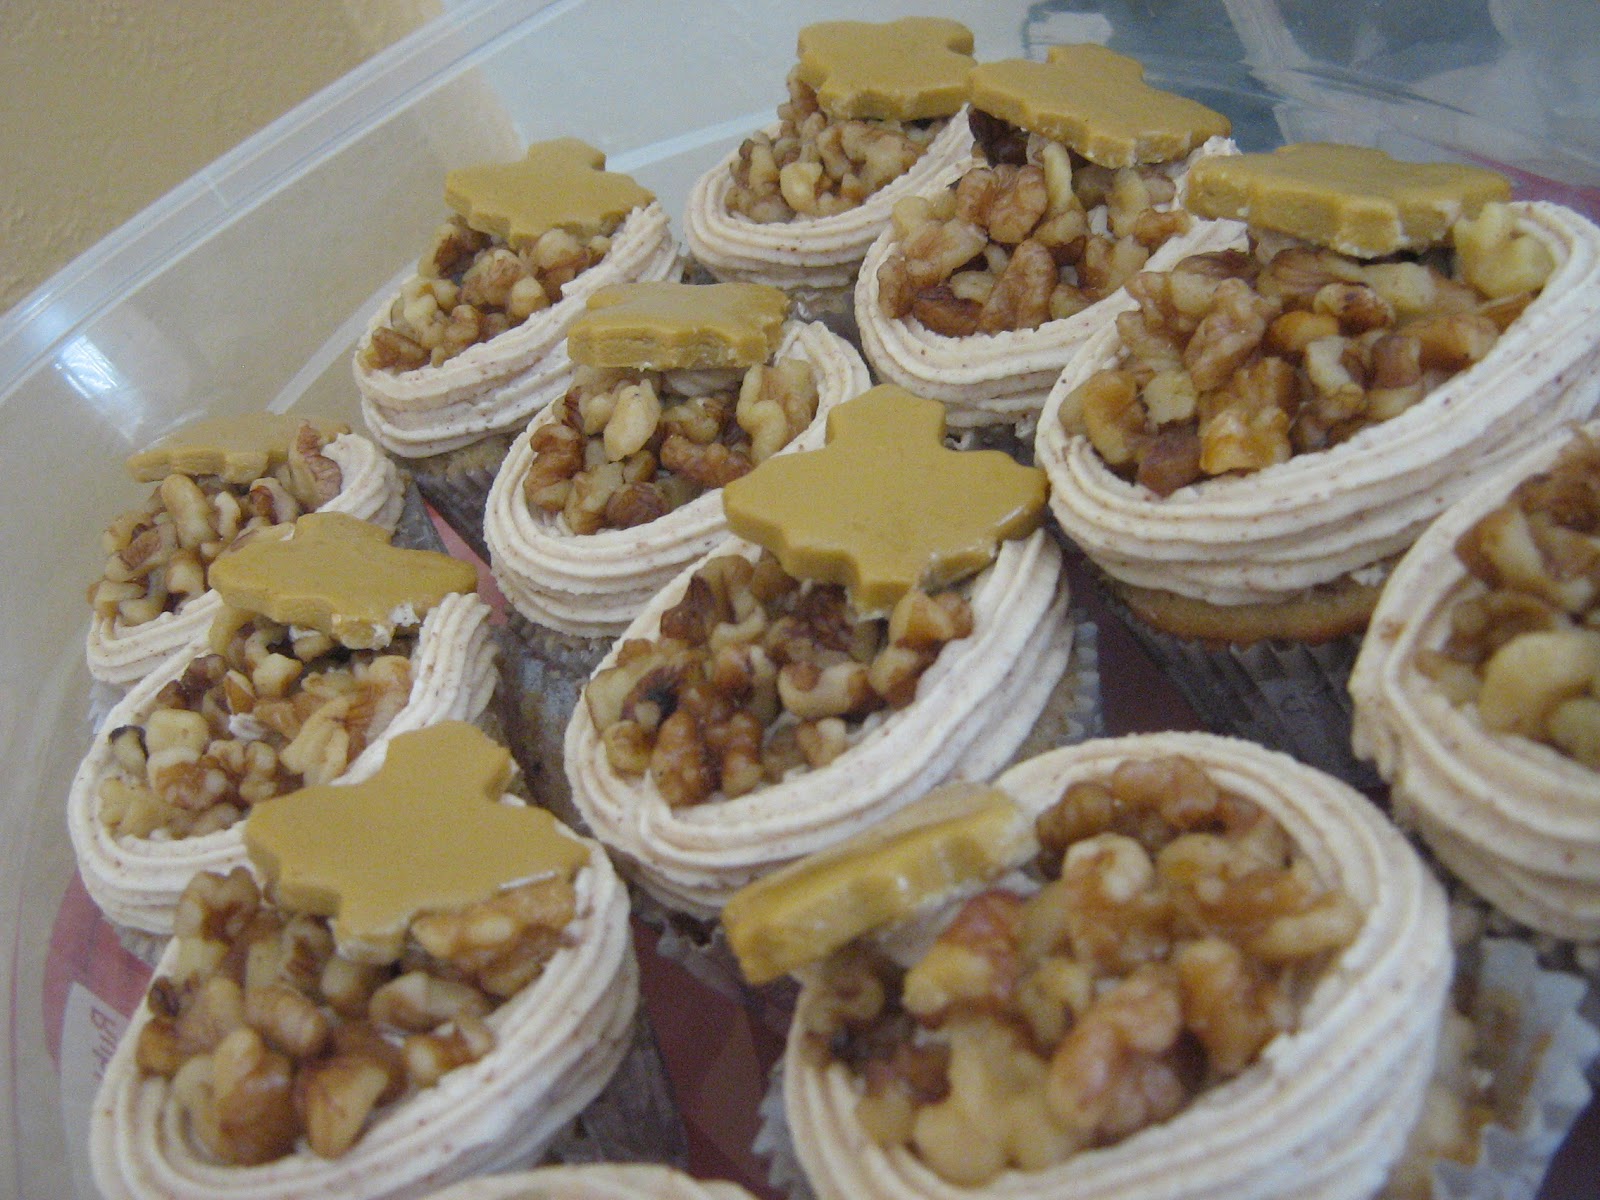
What I ended up with was a walnut cinnamon cake filled with a maple pie filling, frosted with a maple almond butter frosting, topped with lightly toasted walnuts and a fondant maple leaf. Here's the long road that got me to that end.


I practiced several recipes in the two or three weeks leading up to the party. I tested out at least four cake recipes and four frosting recipes. I also made a maple filling using a recipe that fills a maple tart from BHG's recent Fall Baking issue. This filing is fabulous. I want to try making the tart.

Cakes:
  • Butter cake - too dense and dry
  • Doctored yellow cake mix - too sweet
  • Walnut cake made with crushed walnuts - too whole wheat tasting
  • Martha Stewart's Walnut cake - the winner!
Frostings:
  • Maple cream cheese frosting - too loose
  • Brown sugar maple frosting - too brown sugary
  • Frosting using my recipe for maple filling as the base - not as maple tasting as I wanted
  • Maple French buttercream from Martha Stewart - the winner again! Go Martha!

One of the things I realized as I tested out recipes was that I kept looking for the maple flavor you find in a maple doughnut. The recipes using pure maple syrup instead of maple flavoring are a whole different ball game. I got over my desire for the fake flavor that I know and love and went with recipes using pure maple syrup. They were just better recipes. Here is one of my test batches. I decorated with a brown sugar cookie in the shape of a maple leaf.


So here's where the trouble starts: when I went to use my carefully chosen recipes for the big day, my buttercream didn't turn out. The only thing I did differently was double the recipe. I don't know what happened. It just wasn't my day I guess. The frosting was way too loose and wouldn't firm up for anything.

In a panic, and after a few tears, I pulled out the other frostings I had practiced on earlier that week. I had them in the freezer. I used both the brown sugar maple frosting and the one I made up out of my filling. I had also purchased some gold sugar for dusting and made fondant maple leafs to decorate. Here are the finished cakes.


They were so beautiful; that's why what happened next was so heartbreaking. We transported the cupcakes about 5 or 6 hours and when we went to put them in my mother-in-law's freezer for the next day we found that the frostings had melted. The cupcakes were globby messes.

There I was away from kitchen and all of my tools with my finished product in shambles. It was hard to sleep that night. The next day I went to four different stores looking for replacement frosting and decorating ingredients. I was praying that I would be able to salvage the cakes. I ended up buying extra baking cups in case I had to transfer the cakes to cups that weren't covered with melty frosting, plastic piping tips, a bag of walnuts, and for the frosting, maple almond butter, maple flavoring, butter and powdered sugar. I was also hoping to salvage my fondant maple leaves.

When I got back to my mother-in-law's house I painstakingly scraped off all of the melty frosting - even from the pretty baking cups. I also cleaned the fondant leaves. I was able to salvage it all. Whew!

I lightly toasted my walnuts and went to work on my frosting. Here is the recipe I made up:

Maple Almond Butter Frosting:
1 cup unsalted butter
1/3 cup maple almond butter
1/2 tsp maple flavoring
4 cups powdered sugar
1 - 2 tbsp milk or cream

I ended up liking this frosting more than Martha Stewart's. Here's my finished cupcakes again.


They were delicious. I will definitely do this recipe again. I'll take a shorter route next time though.

Friday, August 31, 2012

Nutella: Round 2

My hubby is transitioning jobs this weekend and requested some cupcakes to give to some of his co-workers as parting gifts. His boss is a Nutella fan, so I revamped a recipe that I had tried before.

The first time I made Nutella cupcakes I used a recipe for a Nutella cake and a Nutella frosting from an online source I can no longer find. The frosting was good. The cake was dry. I filled the cupcakes with chocolate ganache, drizzled the frosted cakes with the ganache as well and topped them with toasted hazelnuts. The cupcakes looked and tasted great. They also got rave reviews from my family. I didn't think they had enough Nutella flavor (and also the cake turned out dry), so I knew I would do something different the next time. Here's my first batch. Forgive the bad picture.


This time I decided to use the chocolate cake recipe from BHG I have been raving about. I also decided to fill the cupcakes with straight up Nutella.


I used a new Nutella frosting recipe from My Baking Addiction as I can't find the first one I used and topped the cakes with either toasted hazelnuts or a hazelnut chocolate chunk.


The first frosting recipe I used was a lot smoother than this recipe, but I like the flavor of this one better. They are both very decadent. It's Nutella. What da ya expect?

Oh, and the cupcakes were a hit with Matthew's co-workers. They're a hit with me too.

Wednesday, August 29, 2012

Baking Day

Last week I got to spend the majority of my Monday baking. Matthew took the boys to the park and I had the whole kitchen to myself. (Thank you Love!) I made three different cakes and four frosting recipes. I felt like I was on Cupcake Wars. Here are my cakes cooling.


The first cake I baked was a pink lemonade cake with a pink lemonade frosting. The recipes call for actual powdered pink lemonade drink mix and they taste just like pink lemonade. I've been feeling like I should decorate my cupcakes a little more. Just frosting is getting a little boring. The recipe for these cupcakes called for a dusting of pink lemonade mix. I thought they tasted "lemonady" enough so I sprinkled them with white nonpareils. I made the mistake of piping the frosting on all my cakes and then adding the sprinkles. Most of them fell off. I either need to add them as soon as I've piped or make my frosting less stiff. These cupcakes adorned my brunch table for a friend's visit.


The second cake I baked was a hummingbird cake. I used a gluten free recipe from Cupcake Project using blanched almond four. Fabulous - absolutely fabulous! I also loved that it only called for the fruit and some honey and no extra sugar. It didn't need it at all. I chose to frost with a simple cinnamon cream cheese frosting. I used my favorite recipe from BHG and added a half teaspoon of cinnamon. Next time I may leave the cinnamon out of the frosting.


The third cake I made was supposed to be a gingerbread cake. It turned out more like a molasses cake in my opinion. I wasn't sure what I was going to do for the frosting. First I tried making a molasses frosting. I based the recipe off of a honey frosting recipe I've done before. This was a complete disaster. The consistency and color were beautiful, but the flavor was horrible. I threw it out. There was no salvaging that one.


Next, I tasted one of the molasses cupcakes with the cinnamon cream cheese frosting I had already made. It was just okay. As I had mixed the batter and baked these cakes I smelled a hint of butterscotch. I decided to make a butterscotch frosting based on a white chocolate frosting recipe I have.

Butterscotch Frosting:
6 oz. butterscotch chips
1/3 cup whipping cream
1 cup unsalted butter
1 1/2 - 2 cups powdered sugar

- Leave butter out for 30 minutes.
- Heat whipping cream to simmering and pour over butterscotch chips. Leave for 5 min.
- Stir to combine and then leave another 15 min.
- Gradually beat butter into butterscotch mixture.
- Gradually beat in powdered sugar until frosting reaches piping consistency.


As if that wasn't enough, I decided to make a brown sugar drizzle to fill the cakes with.

Brown Sugar Drizzle:

Bring 1 stick of butter, 1 cup of packed brown sugar and 1/4 cup of milk to a boil. Cook and stir for 2 minutes. Remove from heat, stir in 1 teaspoon vanilla and let cool to thicken.

This drizzle is like caramel, but not as smooth. Also, it has a distinct brown sugar flavor. This recipe remains grainy. If you prefer smoother textures, make a traditional caramel sauce.


I used a squirt bottle to fill my cupcakes with the drizzle. These work better than ziplocks for fillings that are a little looser.


I used a simple 2D tip to pipe the butterscotch frosting on top. I wish I could have thought of some cute way to decorate these. Maybe a molasses chew or a butterscotch candy on top.


I made this particular cake for a friend who loves spiced cake and caramel. She loved it. My hubby and I also loved them. Delish!

Well, I finally did it. I ate frosting... butterscotch frosting... all by itself... a significant amount of frosting... maybe two or three cupcakes worth. It was too much to throw away, but not enough to want to save, so I piped it into my mouth. I didn't feel sick after, but I did feel a little guilty - but just a little.

Monday, August 27, 2012

Chocolate French Buttercream

This week I tried another fancy buttercream. I chose to do a chocolate French buttercream to go with a basic chocolate cake recipe from BHG I've been wanting to try. If I haven't mentioned this before, most of the BHG recipes I try are from a special edition magazine they did on cupcakes.

This chocolate cake recipe is terrific. Why am I not surprised? So far, everything I've tried from BHG has been great. I made the mistake, however, of filling my cups too high and the cakes baked up over my cupcake liners like big flat hats; not very nice to look at. While I like bigger cupcakes (it makes it easier to eat just one), I'll be careful not to over-fill with this recipe again. Hmm, maybe I should try making jumbo cupcakes.


The buttercream was the fun part. I got my recipe from CDKitchen. It had a five start rating. I started off by melting my sugar and whipping whole eggs.


This frosting, like the Italian buttercream, is a lot softer and lighter than American buttercream. It has the texture of whipped cream. It's also way less sweet. Before I flavored it with chocolate it was almost not sweet enough.

I was a little panicked when I added the butter at the end of the process. The mixture was all soupy. I thought I might have done something wrong and ruined a whole batch. Luckily, I was in a very experimental kind of mood. I turned up my mixer a little higher and just let it keep beating. Several minutes later I could tell that it was thickening. Whew! That was a close one.

After I got the consistency I wanted I added a few ounces of melted semi-sweet chocolate to the buttercream. I meant to weigh out 3 ounces or so, but I couldn't find my scale so I just eyeballed it. I think I ended up with 1/3 to 1/2 cup. I can't believe it worked. I always wonder how chefs on TV can just eyeball stuff and dump it in (not that I'm anything like a chef on TV). Anyway, it looked right, so I went with it.


When it came time to frost my cupcakes I decided to fill them with the buttercream first. I then stumbled my way through a couple of piping techniques. What I really needed was a big round piping tip. Is it just me or is every store in every city always out of basic big round piping tips? I'll have to order one online I guess. I'm usually able to get away with cutting a hole in the corner of a ziplock bag. Cooked buttercreams are so delicate though and my ziplock technique didn't work as well, but I did the best I could.


Both recipes are keepers. The chocolate cake I'll do over and over. The frosting I'll probably reserve for special occasions or when I'm baking for someone who doesn't like overly sweet and heavy frosting.

Tuesday, August 21, 2012

Pistachio Blunders

I put two recipes together to make what I thought was going to be a spectacular pistachio blueberry cupcake with a crumb topping instead of frosting. I should have taken more pictures along the way, but got caught up in the many steps of this endeavor.

I started off with a recipe I found in Food Network Magazine for a pistachio tea cake made with finely pulsed pistachios. Instead of topping each cupcake with a cherry like the recipe said, I decided to top them with fresh blueberries and a pistachio crumble that goes on top of a coffee cake. I found this second recipe in a cookbook that Costco was giving out for free one day. I've made the original coffee cake recipe before and it is fantastic.

Here's the the crumb topping recipe:
1/2 cup chopped pistachios
1/2 cup shredded coconut
1/4 cup brown sugar
3 Tbsp flour
3 Tbsp butter, melted

While my hopes were high for this cupcake, I was brought low fast. The original pistachio cake recipe instructed me to bake the cupcakes for 8 minutes and then add the cherries. I'm guessing so they wouldn't sink to the bottom of the cakes. I followed that direction and pulled out the cakes at 8 minutes to add my blueberries and crumb topping. I baked them another 12 minutes just like the recipe said.

The original recipe for the crumb topped coffee cake baked for an hour. My crumb topping was no where near crusty enough. Also, the cupcakes that should have been done were still all gooey. This is what I get for combining two pretty different recipes.


After lamenting for a while, I put the cupcakes back in the oven hoping they would cook through and the crumble would brown a little more. It all worked out in the end.


I was hoping for some authentic pistachio flavor out of these. I mostly tasted coconut and blueberry. The next time I'm craving pistachio flavor I might try a pistachio pudding cupcake recipe.

Monday, August 20, 2012

Italian Buttercream

I finally purchased a stand mixer. Don't be jealous, but I found it on Craig's List; a KitchenAid, brand new, in the box, for $140. Yay for that!

I've been waiting for this lovely machine to try my hand at Italian and French butterceam recipes as you need eggs/egg whites whipping as you slowly drizzle in a hot sugar syrup. I wanted to try Italian first as I have never tasted it. I used Martha Stewart's Grand Marnier Italian Buttercream recipe, but omitted the Grand Marnier - this time around anyway.

Meringue style frosting is a lot more involved than your run of the mill butter and powdered sugar frosting (American buttercream). I had two to three things going at the same time.

Here's my stand mixer working at the egg whites with sugar syrup and my hand mixer getting ready to go at the butter.


This buttercream is wonderful. If you like whipped cream or meringue kind of flavor and texture this is the buttercream for you. My hubby, who likes more of a whipped cream frosting rather than a buttery one loved this. Funny as there is more butter in this recipe than in your basic American buttercream. A friend of mine thought it was a lot like a cream puff filling. Might have to tackle cream puffs next - or better yet, make a cream puff cupcake.

While the frosting recipe was the star of this show, I still wanted to try a new cake. I went with a basic vanilla cake from BHG. This recipe is on my favorites list. It's almost biscuit-like. The texture is nice and dense just like I like. The cake went great with the frosting, but a little too boring for me.


Because I had so much Italian buttercream left over (the recipe makes a huge batch) I tried another cupcake a few days later. I was worried about the frosting and read up online. It will keep 3 to 5 days. I stored it in my fridge in an airtight container, brought it back to room temperature and re-whipped it in my stand mixer. It was like the day I made it.

So the second cake I made was part of a recipe for a lemon meringue pie cupcake (again from BHG). I followed the recipe for the baking of the cakes, but went in my own direction by filling each cupcake with lemon curd and topping with my Italian buttercream.


The original recipe had you just add a small dollop of curd on top of each cake and then top with real meringue.


My one gripe about this cupcake recipe is the consistency. No matter how much I baked them (I nearly over-baked them) the tops were left a little mushy - like they weren't cooked. The flavor, however, was great. The finished cupcake reminded me of a piece of lemon meringue pie with less lemon tang. Maybe a homemade curd instead of a store bought one would have helped. I wish I could have been more creative with decorating the cakes. I wasn't feeling inspired so I kept it simple.